
← The Chronicle · Learn the Moves
How to Spot a Chess Fork Before It Happens
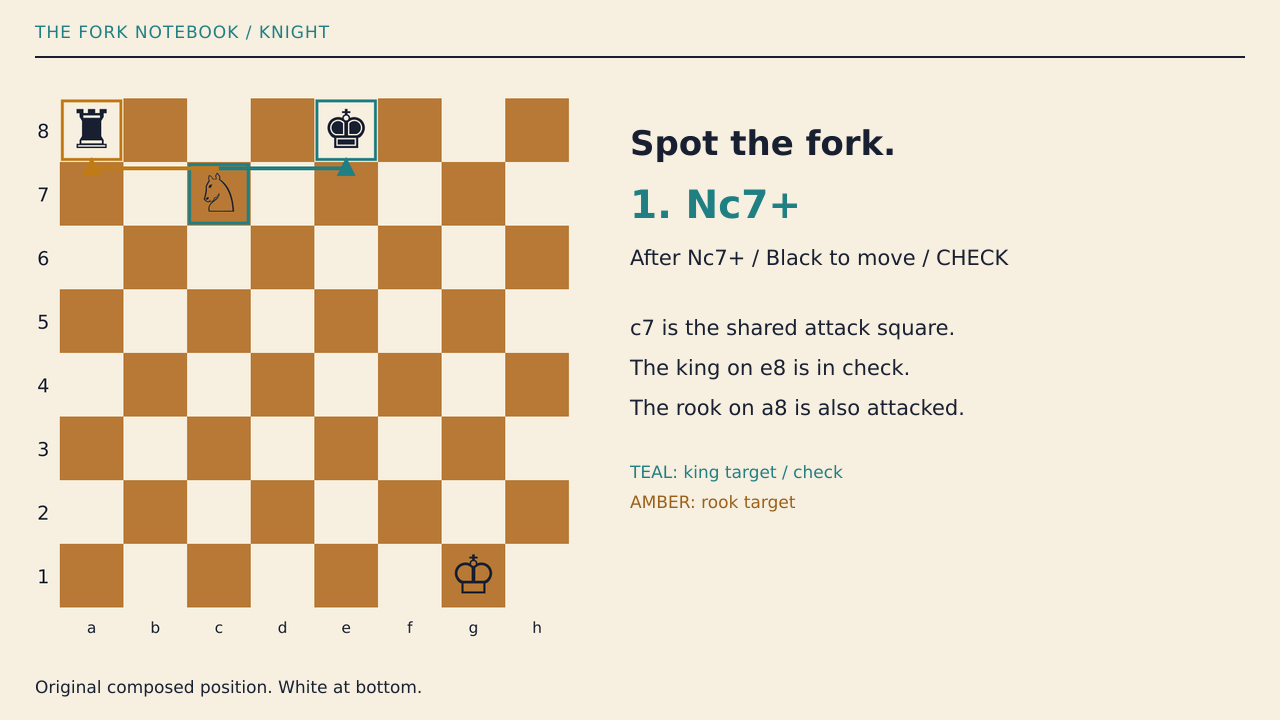
Featured diagram — selectable description. White is at the bottom; a1 is bottom-left. Files a through h run left to right; ranks 1 through 8 run bottom to top. All unlisted squares are empty[3]. The fork notebook / knight: Spot the fork. 1. Nc7+. The board is after Nc7+, Black to move, in check[3]. White king g1 and knight c7; Black king e8 and rook a8[3]. c7 is the shared attack square: the knight attacks the king on e8 (teal king-target/check arrow) and the rook on a8 (amber rook-target arrow)[3]. Original composed position, not a historical game[3]. Test every legal reply before claiming a gain.
View full featured illustration. Use the browser zoom controls for the native-size image, then Back to return to the article.

To spot a fork before it happens, apply the definition of a fork—one piece attacking two or more pieces—to a possible landing square[2], then check whether the piece can legally reach it[1]. Do this on the position you would leave after your intended move—not only on the board as it stands. Before trusting the threat, test whether you can capture the attacker, answer a check while saving the other target, or escape with a forcing reply.
A fork is one piece attacking two or more enemy pieces at the same time.[2] It is a threat to investigate, not an automatic promise of winning material: the teaching definition describes simultaneous attacks, while the outcome depends on the position.[2]
This lesson uses four original composed positions, not positions taken from the sources or a famous game[3]. Checkered Crown composed and calculated these examples; the numbered external references support definitions and rules, not the positions, reply counts or calculated outcomes[3]. Their complete piece lists and concrete replies are given below so you can test the analysis on a board. The goal is a finite spotting-and-defense routine, not a promised rating gain.
Find the landing square, not just the targets
Chess.com's teaching page emphasizes understanding piece movement and paying attention to where the opposing pieces stand.[2] Turn that advice into a question: “Where could one enemy piece land and attack both of these?”
Start with these three patterns:
- Knight: Look for a common knight-attack square near two targets; the knight's movement differs from movement along a rank, file or diagonal.[1]
- Pawn: Look for a pawn advance that would place two targets on its forward diagonals; pawns capture diagonally forward, not straight ahead.[1]
- Queen: Look for an intersection of an open rank, file or diagonal with another attacking line; the queen can move in all three of those directions.[1]
For a queen fork, check every intervening square: queens cannot jump over pieces.[1] For a pawn fork, distinguish the square the pawn moves to from the squares it would capture on: a forward advance is not a diagonal capture.[1] Do not restrict the search to knights; every piece can deliver a fork.[2]
Try this before releasing your intended move:
- Place it mentally. What position would your move leave?
- Choose a target pair. Begin with your king and queen, then other exposed pieces.
- Find a shared attack square. Which enemy piece could use it next?
- Test the route and legality. Check intervening pieces for sliding moves and reject any move that leaves the attacker's king in check[1].
- Play your best defense. Can you remove the attacker or save both targets?
The legality test matters: no move may leave or expose the moving side's king to check.[1] An arrow cannot override the rule against leaving your king in check[1].
Three original forks you can set up
Use an ordinary board with White at the bottom and a1 at the bottom-left. Only the listed pieces are present; White moves first in every example, with no castling or en passant rights[3]. In the move text, K means king, Q queen and N knight; x means capture and + means check[1].
1. Knight fork: the danger square is c7
Position: White king g1, knight b5; Black king e8, rook a8[3].
Before moving the knight, identify its destination and both targets. In this original position, 1. Nc7+ puts the knight on c7, attacking the king on e8 and the rook on a8[3]. Black has five legal replies—Kd7, Kd8, Ke7, Kf7 and Kf8—and White can answer each with 2. Nxa8, capturing the rook[3]. For example, 1. Nc7+ Kd7 2. Nxa8 leaves White with the knight and Black without the rook[3].
The defensive warning appears before the knight jumps: e8 and a8 share the knight-attack square c7[3]. If you were Black before allowing this arrangement, moving a target or preventing the knight's access to c7 would be candidate preventive ideas, not moves to play without checking the rest of a real position.
A checking fork is especially urgent because a legal reply cannot leave the king in check.[1] That does not mean the king must always move; removing the checking piece can also make the king safe under the same rule.[1]
2. Pawn fork: the advance and captures use different squares
Read the diagram description
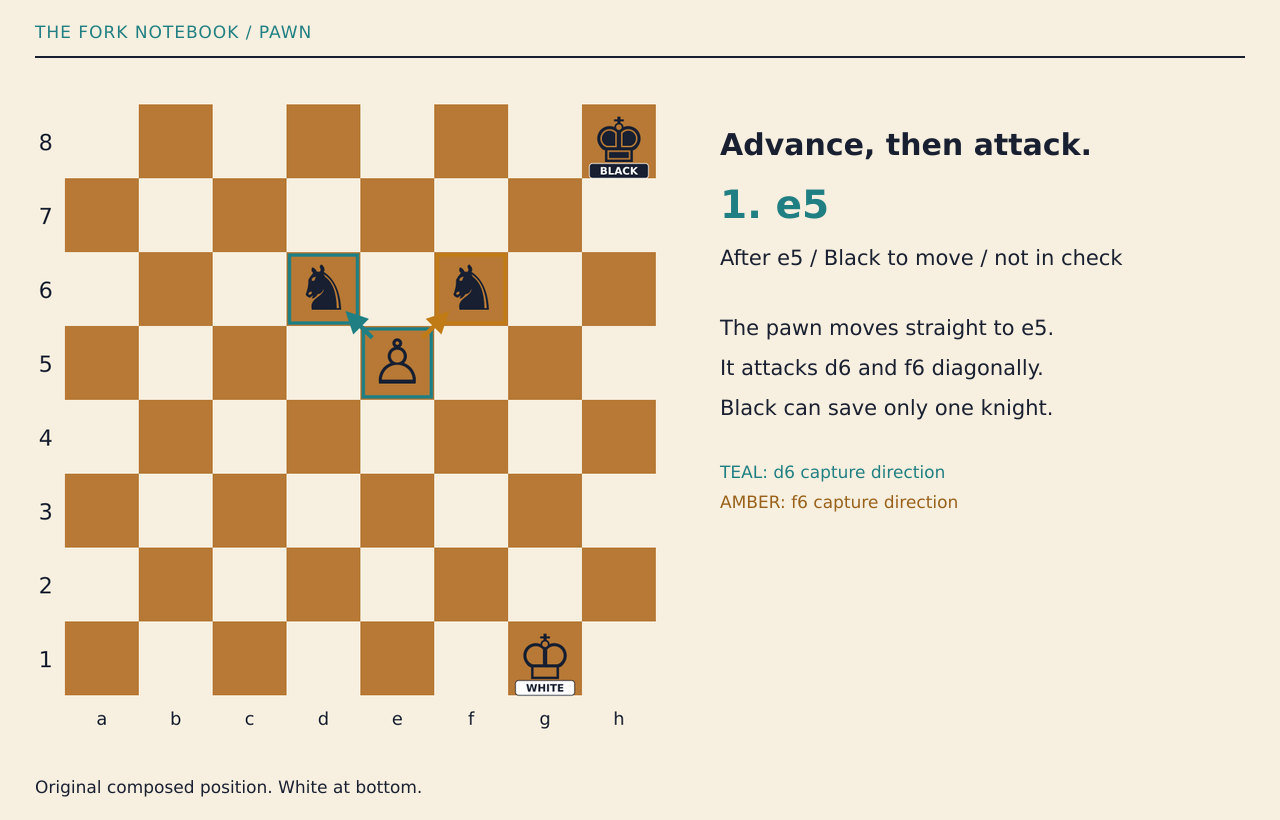
White is at the bottom; a1 is bottom-left. Files a through h run left to right; ranks 1 through 8 run bottom to top. All unlisted squares are empty. White-at-bottom board after e5: Black king h8, Black knight d6, Black knight f6, White pawn e5, White king g1. Black to move / not in check. The pawn moves straight to e5. It attacks d6 and f6 diagonally. Black can save only one knight. Original composed pawn example, shown after e5; Black to move / not in check. The pawn moves straight to e5. It attacks d6 and f6 diagonally. Black can save only one knight. Continue through the recapture: a knight for a pawn. The outlined king on h8 belongs to Black; the outlined king on g1 belongs to White. The BLACK and WHITE badges are side labels, not extra pieces. Teal marks the d6 diagonal capture direction; amber marks the f6 diagonal capture direction. Neither arrow is the straight advance from e4 to e5.
View full illustration (opens in a new tab)
Original composed pawn example, shown after e5; Black to move / not in check[3]. The pawn moves straight to e5[3]. It attacks d6 and f6 diagonally[3]. Black can save only one knight[3]. Continue through the recapture: a knight for a pawn[3].
Selectable diagram reading. White is at the bottom; a1 is bottom-left. Files a through h run left to right; ranks 1 through 8 run bottom to top. All unlisted squares are empty[3]. White-at-bottom board after e5: Black king h8, Black knight d6, Black knight f6, White pawn e5, White king g1[3]. Black to move / not in check[3]. The pawn moves straight to e5[3]. It attacks d6 and f6 diagonally[3]. Black can save only one knight[3]. Original composed pawn example, shown after e5; Black to move / not in check[3]. The pawn moves straight to e5[3]. It attacks d6 and f6 diagonally[3]. Black can save only one knight[3]. Continue through the recapture: a knight for a pawn[3]. The outlined king on h8 belongs to Black; the outlined king on g1 belongs to White[3]. The BLACK and WHITE badges are side labels, not extra pieces. Teal marks the d6 diagonal capture direction; amber marks the f6 diagonal capture direction. Neither arrow is the straight advance from e4 to e5.
Position: White king g1, pawn e4; Black king h8, knights d6 and f6[3].
The common landing square is e5[3]. In this original position, 1. e5 attacks the knights on d6 and f6, even though the pawn has just moved straight forward[3]. Black has nineteen legal replies; after each, White has at least one legal pawn capture of a knight[3]. One concrete defense is 1. e5 Nde4 2. exf6 Nxf6: the knight from d6 goes to e4, White captures the knight on f6, and the surviving knight recaptures the pawn[3].
Here Black loses a knight but wins a pawn in return[3]. That is not the same as losing a knight for nothing, and it is why the analysis must continue beyond the first capture[3]. This is a local material result, not a claim that the resulting game is a forced win[3].
The underlying movement rule is simple: a pawn captures an opposing piece diagonally in front of it on an adjacent file.[1] When defending, therefore, inspect the two squares a pawn would attack after its next advance, rather than looking only at the square directly ahead of it.[1]
3. Queen fork: check on one line, a rook on another
Read the diagram description
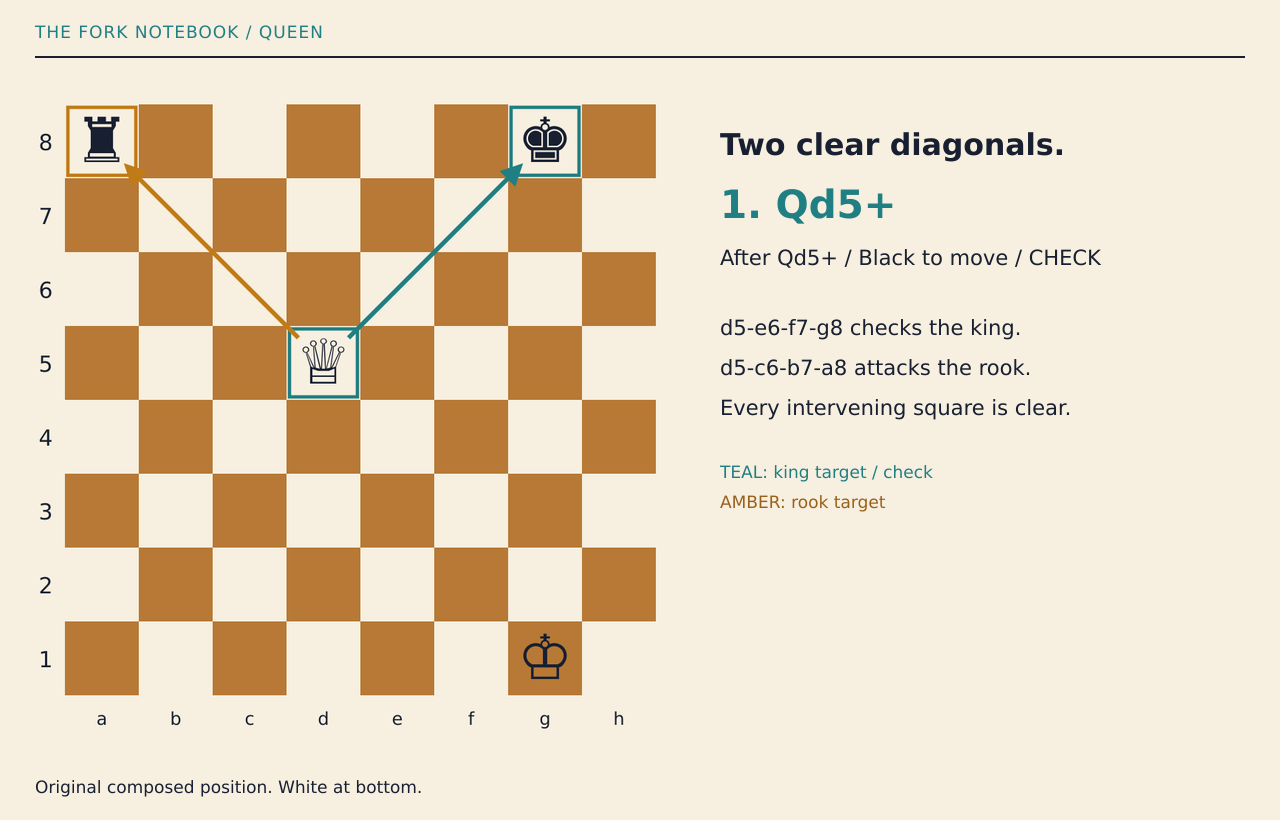
White is at the bottom; a1 is bottom-left. Files a through h run left to right; ranks 1 through 8 run bottom to top. All unlisted squares are empty. White-at-bottom board after Qd5+: Black rook a8, Black king g8, White queen d5, White king g1. Black to move / CHECK. d5-e6-f7-g8 checks the king. d5-c6-b7-a8 attacks the rook. Every intervening square is clear. Original composed queen example, shown after Qd5+; Black to move / CHECK. d5-e6-f7-g8 checks the king. d5-c6-b7-a8 attacks the rook. Every intervening square is clear. A sliding piece cannot jump over an obstruction.
View full illustration (opens in a new tab)
Original composed queen example, shown after Qd5+; Black to move / CHECK[3]. d5-e6-f7-g8 checks the king[3]. d5-c6-b7-a8 attacks the rook[3]. Every intervening square is clear[3]. A sliding piece cannot jump over an obstruction.
Selectable diagram reading. White is at the bottom; a1 is bottom-left. Files a through h run left to right; ranks 1 through 8 run bottom to top. All unlisted squares are empty[3]. White-at-bottom board after Qd5+: Black rook a8, Black king g8, White queen d5, White king g1[3]. Black to move / CHECK[3]. d5-e6-f7-g8 checks the king[3]. d5-c6-b7-a8 attacks the rook[3]. Every intervening square is clear[3]. Original composed queen example, shown after Qd5+; Black to move / CHECK[3]. d5-e6-f7-g8 checks the king[3]. d5-c6-b7-a8 attacks the rook[3]. Every intervening square is clear[3]. A sliding piece cannot jump over an obstruction.
Position: White king g1, queen d1; Black king g8, rook a8[3].
For this search, use the queen's permitted diagonal movement[1]; look for the meeting point of the diagonals leading to the two black pieces. In this original position, 1. Qd5+ attacks g8 along d5–e6–f7–g8 and a8 along d5–c6–b7–a8[3]. Black's four legal replies are Kf8, Kh8, Kg7 and Kh7; White can answer every one with 2. Qxa8, capturing the rook[3]. A sample line is 1. Qd5+ Kh7 2. Qxa8.
These are queen attacks along diagonals, which are among the queen's permitted movement lines.[1] In a fuller position, a piece on one of those intervening squares would obstruct that line, because the queen may not move over intervening pieces.[1] Check for intervening pieces on the actual board, because a queen cannot jump over them[1].
When a fork fails: capture the attacker
Read the diagram description
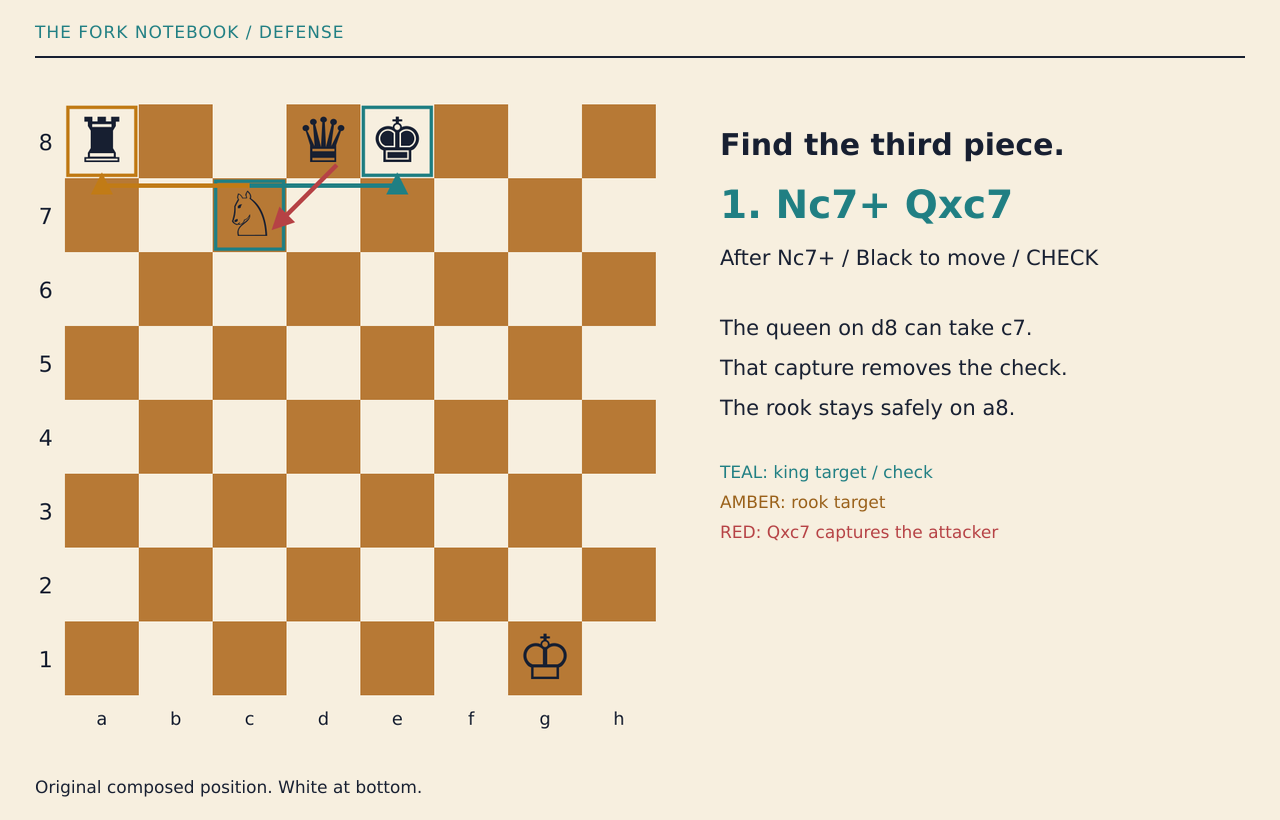
White is at the bottom; a1 is bottom-left. Files a through h run left to right; ranks 1 through 8 run bottom to top. All unlisted squares are empty. White-at-bottom board after Nc7+: Black rook a8, Black queen d8, Black king e8, White knight c7, White king g1. Black to move / CHECK. The queen on d8 can take c7. That capture removes the check. The rook stays safely on a8. Original composed defense example, shown after Nc7+; Black to move / CHECK. The queen on d8 can take c7. That capture removes the check. The rook stays safely on a8. A checking fork is not an automatic material win.
View full illustration (opens in a new tab)
Original composed defense example, shown after Nc7+; Black to move / CHECK[3]. The queen on d8 can take c7[3]. That capture removes the check[3]. The rook stays safely on a8[3]. A checking fork is not an automatic material win[3].
Selectable diagram reading. White is at the bottom; a1 is bottom-left. Files a through h run left to right; ranks 1 through 8 run bottom to top. All unlisted squares are empty[3]. White-at-bottom board after Nc7+: Black rook a8, Black queen d8, Black king e8, White knight c7, White king g1[3]. Black to move / CHECK[3]. The queen on d8 can take c7[3]. That capture removes the check[3]. The rook stays safely on a8[3]. Original composed defense example, shown after Nc7+; Black to move / CHECK[3]. The queen on d8 can take c7[3]. That capture removes the check[3]. The rook stays safely on a8[3]. A checking fork is not an automatic material win[3].
Original defense position: White king g1, knight b5; Black king e8, queen d8, rook a8[3].
This looks like the first knight example, but Black has an extra defender[3]. After 1. Nc7+, the knight again attacks e8 and a8, yet 1...Qxc7 legally captures it and removes the check[3]. The rook remains on a8, and White has lost the knight rather than won the rook[3].
The lesson is not “checking forks always win”; it is “checks restrict the legal replies.” A reply that captures the checking piece is available if it leaves the defender's king safe.[1] Look beyond the two targets: a capture is a possible defense only if it leaves the king safe[1].
A defense checklist for a fork you have spotted
A fork's purpose is often to leave the defender unable to save every attacked piece, allowing a material gain.[2] Before accepting that outcome, try these questions in order:
- Can I capture the forking piece? A capture must also satisfy the king-safety rule[1]; use the queen defense above as your model.
- If I am in check, which replies actually remove it? Reject any reply that leaves your king attacked.[1]
- Can one legal move save both targets? For a sliding attack, test an obstruction because bishops, rooks and queens cannot cross intervening pieces[1]; also test a capture or a defensive move by one target.
- Can I use a forcing reply? Test a check or counterattack, but calculate the answer instead of assuming the opponent must cooperate.
- After the target is captured, can I recapture? Count what each side actually loses, as in the pawn example.
Blocking a line is relevant to a queen, rook or bishop because those pieces cannot move over intervening pieces.[1] It is not a substitute for checking the particular attack: identify which piece is giving check and apply its movement rule.[1] Whatever defense you consider, king safety remains compulsory.[1]
If you spot the threat before it arrives, return to your intended move. Ask whether another move can separate the targets, protect the landing square, or remove access to it. Those are candidate repairs, not universal answers; test the opponent's reply to each.
Finish with one short practice task
Set up the knight position and name c7 before moving anything. Then add the black queen on d8 and explain why the same knight jump no longer wins the rook. Finally, set up the pawn position and play the complete exchange, including the recapture.
Stop after those three tasks. In a finished game of your own, choose one moment and ask: “What shared attack square did my move leave, and what was my legal defense?” The useful habit is to see the landing square early, then verify the reply—not merely to recognize the fork after a piece has gone.
Sources
Related stories
Learn the Moves
How to Read Chess Notation: SAN Moves and PGN Games
Decode SAN moves, distinguish captures, castling and starting-square clues, then replay an original PGN teaching exercise.
Read the story →